1.Traefik 介绍
官网:https://doc.traefik.io/traefik/
Træfɪk 是一个为了让部署微服务更加便捷而诞生的现代HTTP反向代理、负载均衡工具。 它支持多种后台 (Docker, Swarm, Kubernetes, Marathon, Mesos, Consul, Etcd, Zookeeper, BoltDB, Rest API, file…) 来自动化、动态的应用它的配置文件设置。
traefik 和 nginx 最大的不同是,它支持自动化更新反向代理和负载均衡配置。
特点
- 无须重启即可更新配置
- 自动的服务发现与负载均衡
- 与 docker 的完美集成,基于 container label 的配置
- 漂亮的 dashboard 界面
- metrics 的支持,对 prometheus 和 k8s 的集成
核心概念
Traefik 是一个边缘路由器,是你整个平台的大门,拦截并路由每个传入的请求:它知道所有的逻辑和规则,这些规则确定哪些服务处理哪些请求;传统的反向代理需要一个配置文件,其中包含路由到你服务的所有可能路由,而 Traefik 会实时检测服务并自动更新路由规则,可以自动服务发现。
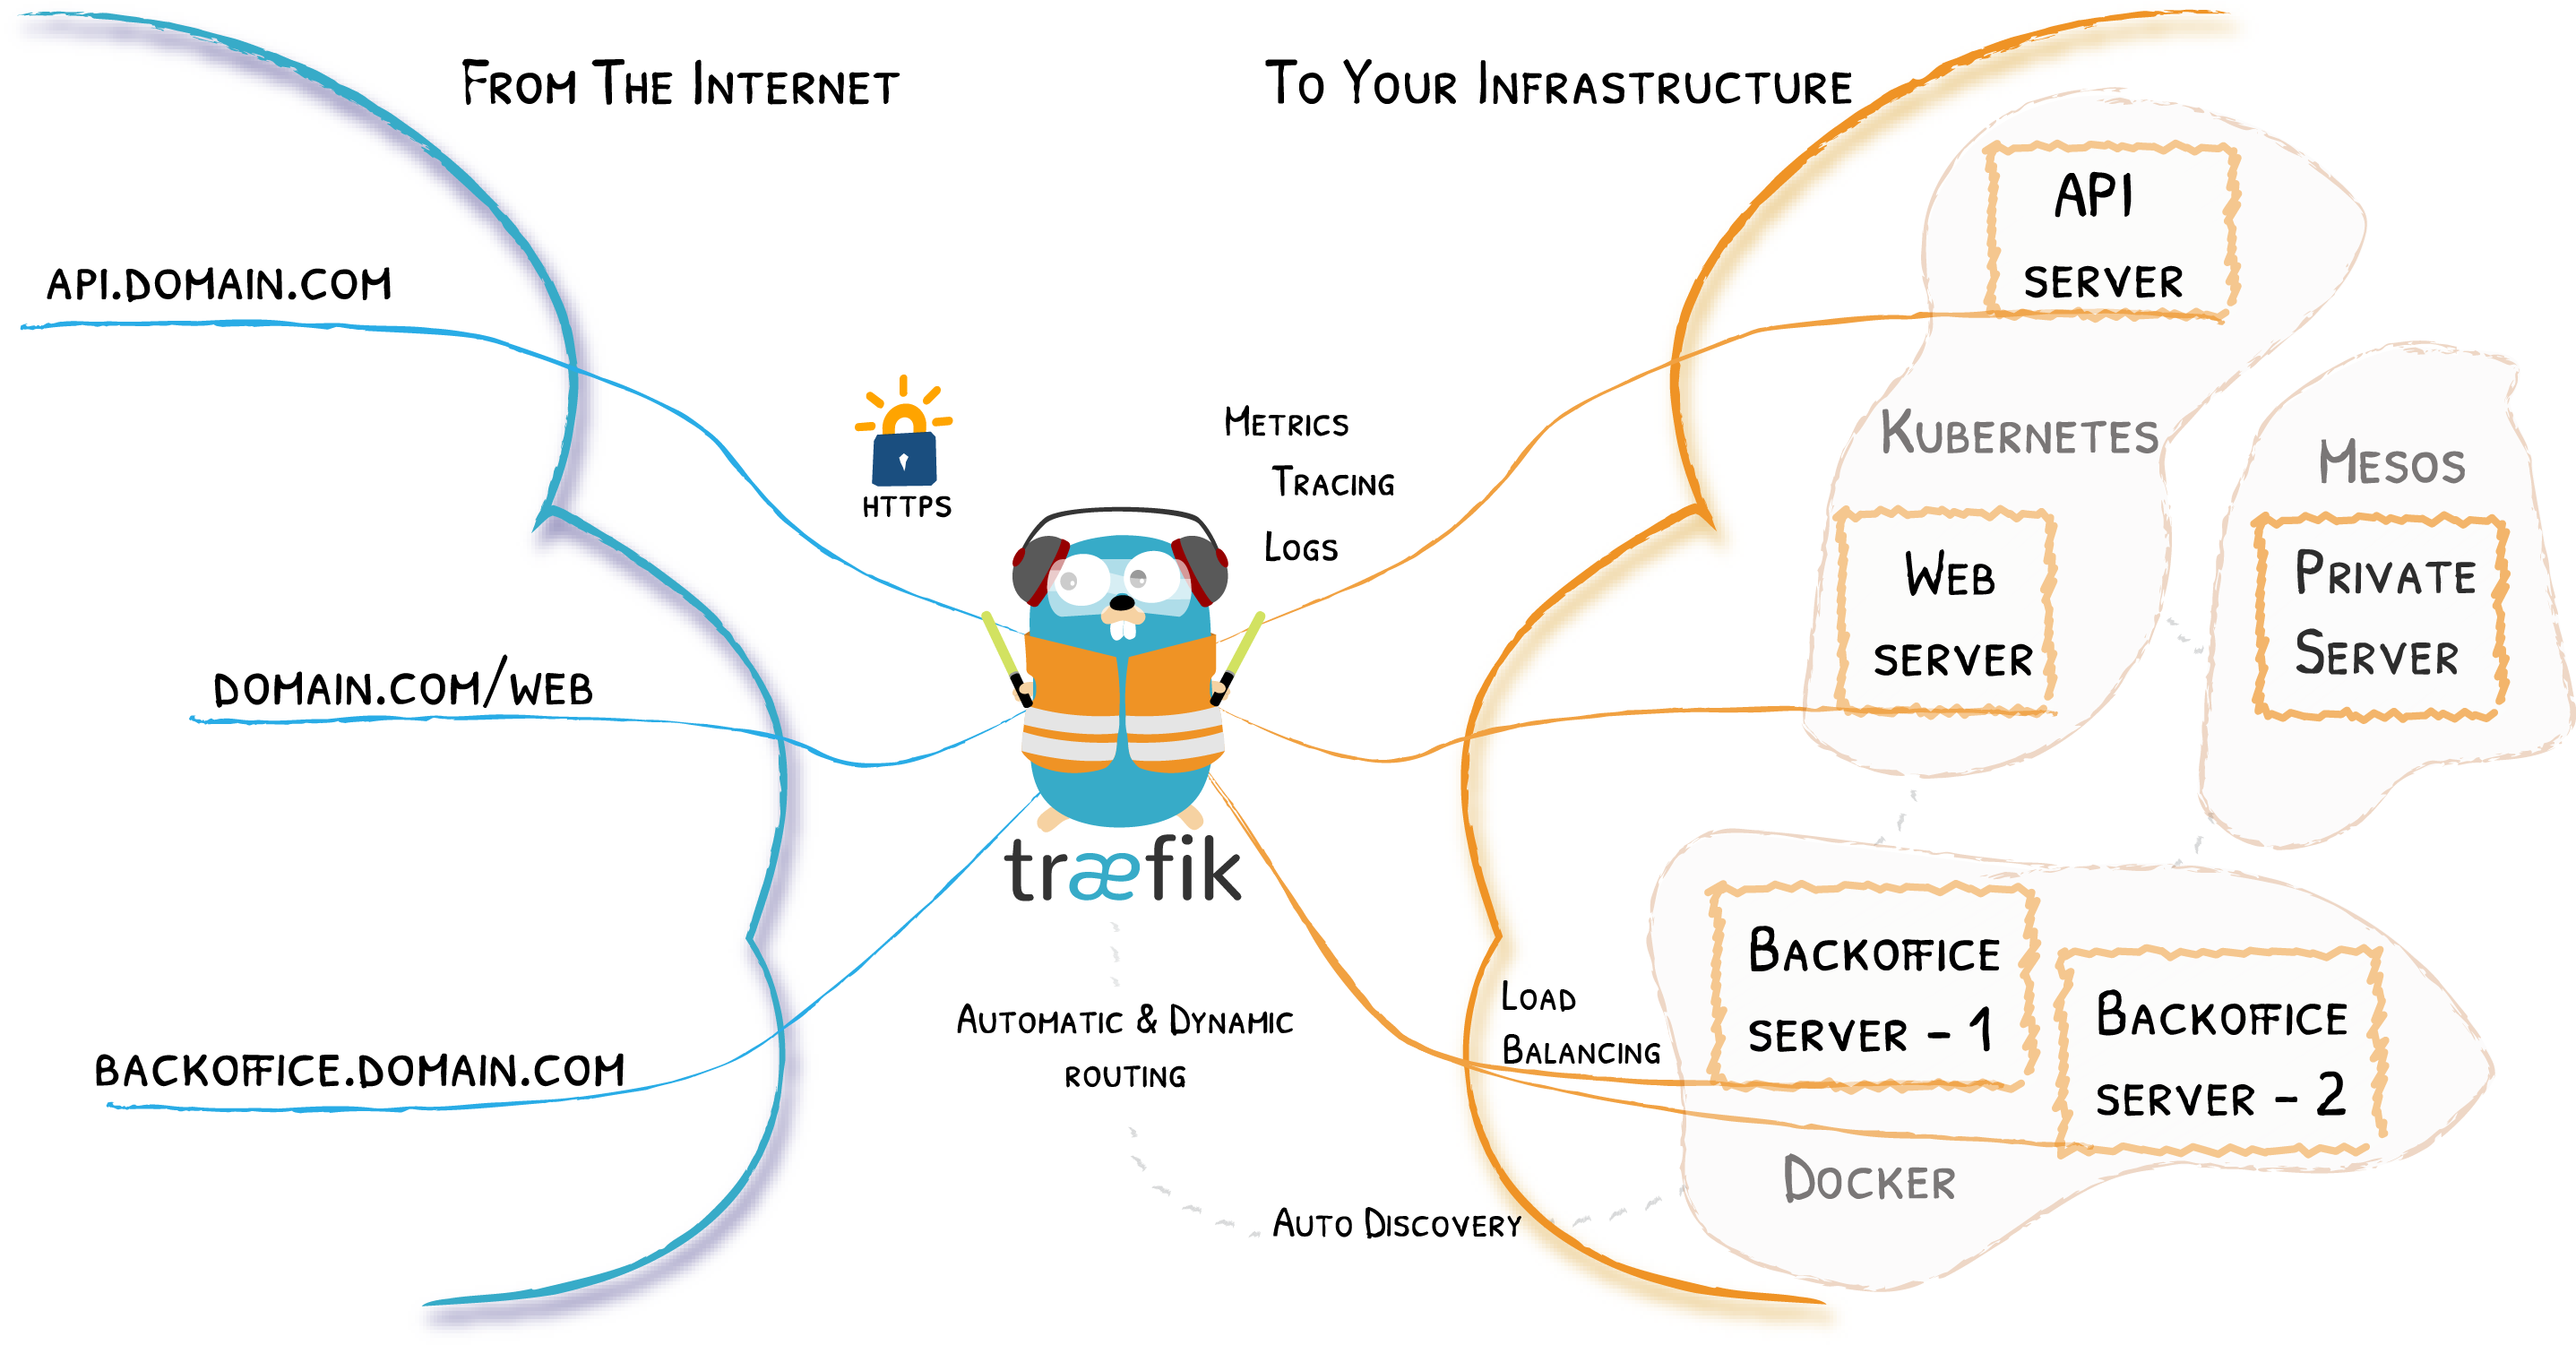
首先,当启动 Traefik 时,需要定义 entrypoints(入口点),然后,根据连接到这些 entrypoints 的路由来分析传入的请求,来查看他们是否与一组规则相匹配,如果匹配,则路由可能会将请求通过一系列中间件转换过后再转发到你的服务上去。在了解 Traefik 之前有几个核心概念我们必须要了解:
- Providers 用来自动发现平台上的服务,可以是编排工具、容器引擎或者 key-value 存储等,比如 Docker、Kubernetes、File
- Entrypoints 监听传入的流量(端口等…),是网络入口点,它们定义了接收请求的端口(HTTP 或者 TCP)。
- Routers 分析请求(host, path, headers, SSL, …),负责将传入请求连接到可以处理这些请求的服务上去。
- Services 将请求转发给你的应用(load balancing, …),负责配置如何获取最终将处理传入请求的实际服务。
- Middlewares 中间件,用来修改请求或者根据请求来做出一些判断(authentication, rate limiting, headers, …),中间件被附件到路由上,是一种在请求发送到你的服务之前(或者在服务的响应发送到客户端之前)调整请求的一种方法。
2.部署 Traefik 2.0
在 traefik v2.0 版本后,开始使用 CRD(Custom Resource Definition)来完成路由配置等,
所以需要提前创建 CRD 资源。下面进行安装过程。
注:我们这里是将traefik部署在ingress-traefik命名空间,如果你需要部署在其他命名空间,需要更改资源清单,
如果你是部署在和我同样的命令空间中,你需要创建该命名空间。
mkdir -p /home/yaml/traefik
cd /home/yaml/traefik
2.1 创建CRD资源
Traefik 2.0版本后开始使用CRD来对资源进行管理配置,所以我们需要先创建CRD资源。
cat >traefik-crd.yaml<<EOF
## Namspace
apiVersion: v1
kind: Namespace
metadata:
  name: ingress-traefik
---
## IngressRoute
apiVersion: apiextensions.k8s.io/v1beta1
kind: CustomResourceDefinition
metadata:
  name: ingressroutes.traefik.containo.us
spec:
  scope: Namespaced
  group: traefik.containo.us
  version: v1alpha1
  names:
    kind: IngressRoute
    plural: ingressroutes
    singular: ingressroute
---
## IngressRouteTCP
apiVersion: apiextensions.k8s.io/v1beta1
kind: CustomResourceDefinition
metadata:
  name: ingressroutetcps.traefik.containo.us
spec:
  scope: Namespaced
  group: traefik.containo.us
  version: v1alpha1
  names:
    kind: IngressRouteTCP
    plural: ingressroutetcps
    singular: ingressroutetcp
---
## Middleware
apiVersion: apiextensions.k8s.io/v1beta1
kind: CustomResourceDefinition
metadata:
  name: middlewares.traefik.containo.us
spec:
  scope: Namespaced
  group: traefik.containo.us
  version: v1alpha1
  names:
    kind: Middleware
    plural: middlewares
    singular: middleware
---
apiVersion: apiextensions.k8s.io/v1beta1
kind: CustomResourceDefinition
metadata:
  name: tlsoptions.traefik.containo.us
spec:
  scope: Namespaced
  group: traefik.containo.us
  version: v1alpha1
  names:
    kind: TLSOption
    plural: tlsoptions
    singular: tlsoption
---
## TraefikService
apiVersion: apiextensions.k8s.io/v1beta1
kind: CustomResourceDefinition
metadata:
  name: traefikservices.traefik.containo.us
spec:
  scope: Namespaced
  group: traefik.containo.us
  version: v1alpha1
  names:
    kind: TraefikService
    plural: traefikservices
    singular: traefikservice

---
## TraefikTLSStore
apiVersion: apiextensions.k8s.io/v1beta1
kind: CustomResourceDefinition
metadata:
  name: tlsstores.traefik.containo.us
spec:
  scope: Namespaced
  group: traefik.containo.us
  version: v1alpha1
  names:
    kind: TLSStore
    plural: tlsstores
    singular: tlsstore

---
## IngressRouteUDP
apiVersion: apiextensions.k8s.io/v1beta1
kind: CustomResourceDefinition
metadata:
  name: ingressrouteudps.traefik.containo.us
spec:
  scope: Namespaced
  group: traefik.containo.us
  version: v1alpha1
  names:
    kind: IngressRouteUDP
    plural: ingressrouteudps
    singular: ingressrouteudp
EOF
#部署 CRD 资源
kubectl apply -f traefik-crd.yaml
2.2 创建 RBAC 权限
Kubernetes 在 1.6 以后的版本中引入了基于角色的访问控制(RBAC)策略,方便对 Kubernetes 资源和 API 进行细粒度控制。
Traefik 需要一定的权限,所以这里提前创建好 Traefik ServiceAccount 并分配一定的权限。
cat >traefik-rbac.yaml<<EOF
apiVersion: v1
kind: ServiceAccount
metadata:
  namespace: ingress-traefik
  name: traefik-ingress-controller
---
kind: ClusterRole
apiVersion: rbac.authorization.k8s.io/v1beta1
metadata:
  name: traefik-ingress-controller
rules:
  - apiGroups: [""]
    resources: ["services","endpoints","secrets"]
    verbs: ["get","list","watch"]
  - apiGroups: ["extensions"]
    resources: ["ingresses"]
    verbs: ["get","list","watch"]
  - apiGroups: ["extensions"]
    resources: ["ingresses/status"]
    verbs: ["update"]
  - apiGroups: ["traefik.containo.us"]
    resources: ["middlewares"]
    verbs: ["get","list","watch"]
  - apiGroups: ["traefik.containo.us"]
    resources: ["ingressroutes","traefikservices"]
    verbs: ["get","list","watch"]
  - apiGroups: ["traefik.containo.us"]
    resources: ["ingressroutetcps","ingressrouteudps"]
    verbs: ["get","list","watch"]
  - apiGroups: ["traefik.containo.us"]
    resources: ["tlsoptions","tlsstores"]
    verbs: ["get","list","watch"]
---
kind: ClusterRoleBinding
apiVersion: rbac.authorization.k8s.io/v1beta1
metadata:
  name: traefik-ingress-controller
roleRef:
  apiGroup: rbac.authorization.k8s.io
  kind: ClusterRole
  name: traefik-ingress-controller
subjects:
  - kind: ServiceAccount
    name: traefik-ingress-controller
    namespace: ingress-traefik
EOF
#部署 Traefik RBAC 资源
kubectl apply -f traefik-rbac.yaml
2.3 安装 Kubernetes Gateway CRD 资源
由于目前 Kubernetes 集群上默认没有安装 Service APIs,我们需要提前安装 Gateway API 的 CRD 资源,
需要确保在 Traefik 安装之前启用 Service APIs 资源。
git clone https://github.com/kubernetes-sigs/gateway-api.git
cd gateway-api/config/crd/stable/
#安装
kubectl apply -f .
customresourcedefinition.apiextensions.k8s.io/backendpolicies.networking.x-k8s.io created
customresourcedefinition.apiextensions.k8s.io/gatewayclasses.networking.x-k8s.io created
customresourcedefinition.apiextensions.k8s.io/gateways.networking.x-k8s.io created
customresourcedefinition.apiextensions.k8s.io/httproutes.networking.x-k8s.io created
customresourcedefinition.apiextensions.k8s.io/tcproutes.networking.x-k8s.io created
customresourcedefinition.apiextensions.k8s.io/tlsroutes.networking.x-k8s.io created
customresourcedefinition.apiextensions.k8s.io/udproutes.networking.x-k8s.io created
2.4 创建 Traefik 配置文件
由于 Traefik 配置很多,使用 CLI 定义操作过于繁琐,尽量使用将其配置选项放到配置文件中,然后存入 ConfigMap,将其挂入 traefik 中。
cat >traefik-config.yaml<<EOF
kind: ConfigMap
apiVersion: v1
metadata:
  name: traefik-config
  namespace: ingress-traefik
data:
  traefik.yaml: |-
    serversTransport:
      insecureSkipVerify: true
    api:
      insecure: true
      dashboard: true
      debug: true
    metrics:
      prometheus: ""
    entryPoints:
      web:
        address: ":80"
      websecure:
        address: ":443"
    providers:
      kubernetesCRD: ""
      kubernetesingress: ""
    log:
      filePath: ""
      level: error
      format: json
    accessLog:
      filePath: ""
      format: json
      bufferingSize: 0
      filters:
        retryAttempts: true
        minDuration: 20
      fields:
        defaultMode: keep
        names:
          ClientUsername: drop
        headers:
          defaultMode: keep
          names:
            User-Agent: redact
            Authorization: drop
            Content-Type: keep
EOF
#部署 Traefik ConfigMap 资源
kubectl apply -f traefik-config.yaml
2.5 设置Label标签
由于使用的Kubernetes DeamonSet方式部署Traefik,所以需要提前给节点设置Label,当程序部署Pod会自动调度到设置Label的node节点上。
设置标签
kubectl label nodes kubeadm-node1 IngressProxy=true
kubectl label nodes kubeadm-node2 IngressProxy=true
#查看标签
[root@kubeadm-master istio]# kubectl get node --show-labels
NAME             STATUS   ROLES                  AGE   VERSION   LABELS
kubeadm-master   Ready    control-plane,master   29d   v1.21.0   beta.kubernetes.io/arch=amd64,beta.kubernetes.io/os=linux,kubernetes.io/arch=amd64,kubernetes.io/hostname=kubeadm-master,kubernetes.io/os=linux,node-role.kubernetes.io/control-plane=,node-role.kubernetes.io/master=,node.kubernetes.io/exclude-from-external-load-balancers=
kubeadm-node1    Ready    worker                 29d   v1.21.0   IngressProxy=true,beta.kubernetes.io/arch=amd64,beta.kubernetes.io/os=linux,kubernetes.io/arch=amd64,kubernetes.io/hostname=kubeadm-node1,kubernetes.io/os=linux,node-role.kubernetes.io/worker=
kubeadm-node2    Ready    worker                 29d   v1.21.0   IngressProxy=true,beta.kubernetes.io/arch=amd64,beta.kubernetes.io/os=linux,kubernetes.io/arch=amd64,kubernetes.io/hostname=kubeadm-node2,kubernetes.io/os=linux,node-role.kubernetes.io/worker=
#节点删除Label标签
kubectl label nodes kubeadm-master IngressProxy-

# kubectl get pod -n ingress-traefik -o wide
NAME                               READY   STATUS    RESTARTS   AGE    IP              NODE            NOMINATED NODE   READINESS GATES
traefik-ingress-controller-tf6td   1/1     Running   0          148m   172.7.98.219    kubeadm-node1   <none>           <none>
traefik-ingress-controller-vq4sn   1/1     Running   0          148m   172.7.139.211   kubeadm-node2   <none>           <none>
2.6 Kubernetes 部署 Traefik
使用DaemonSet类型部署,以便于在多服务器间扩展,使用 hostport 方式占用服务器 80、443 端口,方便流量进入
cat >traefik-deploy.yam<<EOF
apiVersion: v1
kind: Service
metadata:
  name: traefik
  namespace: ingress-traefik
spec:
  ports:
    - name: web
      port: 80
    - name: websecure
      port: 443
    - name: admin
      port: 8080
  selector:
    app: traefik
---
apiVersion: apps/v1
kind: DaemonSet
metadata:
  name: traefik-ingress-controller
  namespace: ingress-traefik
  labels:
    app: traefik
spec:
  selector:
    matchLabels:
      app: traefik
  template:
    metadata:
      name: traefik
      labels:
        app: traefik
    spec:
      serviceAccountName: traefik-ingress-controller
      terminationGracePeriodSeconds: 1
      containers:
        - image: traefik:2.2.0
          name: traefik-ingress-lb
          ports:
            - name: web
              containerPort: 80
              hostPort: 81           #hostPort方式,将端口暴露到集群节点,这里改为81端口,避免占用节点主机80端口
            - name: websecure
              containerPort: 443
              hostPort: 443          #hostPort方式,将端口暴露到集群节点
            - name: admin
              containerPort: 8080
          resources:
            limits:
              cpu: 2000m
              memory: 1024Mi
            requests:
              cpu: 1000m
              memory: 1024Mi
          securityContext:
            capabilities:
              drop:
                - ALL
              add:
                - NET_BIND_SERVICE
          args:
            - --configfile=/config/traefik.yaml
          volumeMounts:
            - mountPath: "/config"
              name: "config"
      volumes:
        - name: config
          configMap:
            name: traefik-config
      tolerations:              #设置容忍所有污点,防止节点被设置污点
        - operator: "Exists"
      nodeSelector:             #设置node筛选器,在特定label的节点上启动
        IngressProxy: "true"
EOF
#部署 Traefik
kubectl apply -f traefik-deploy.yaml
2.7 Traefik 路由规则基础配置
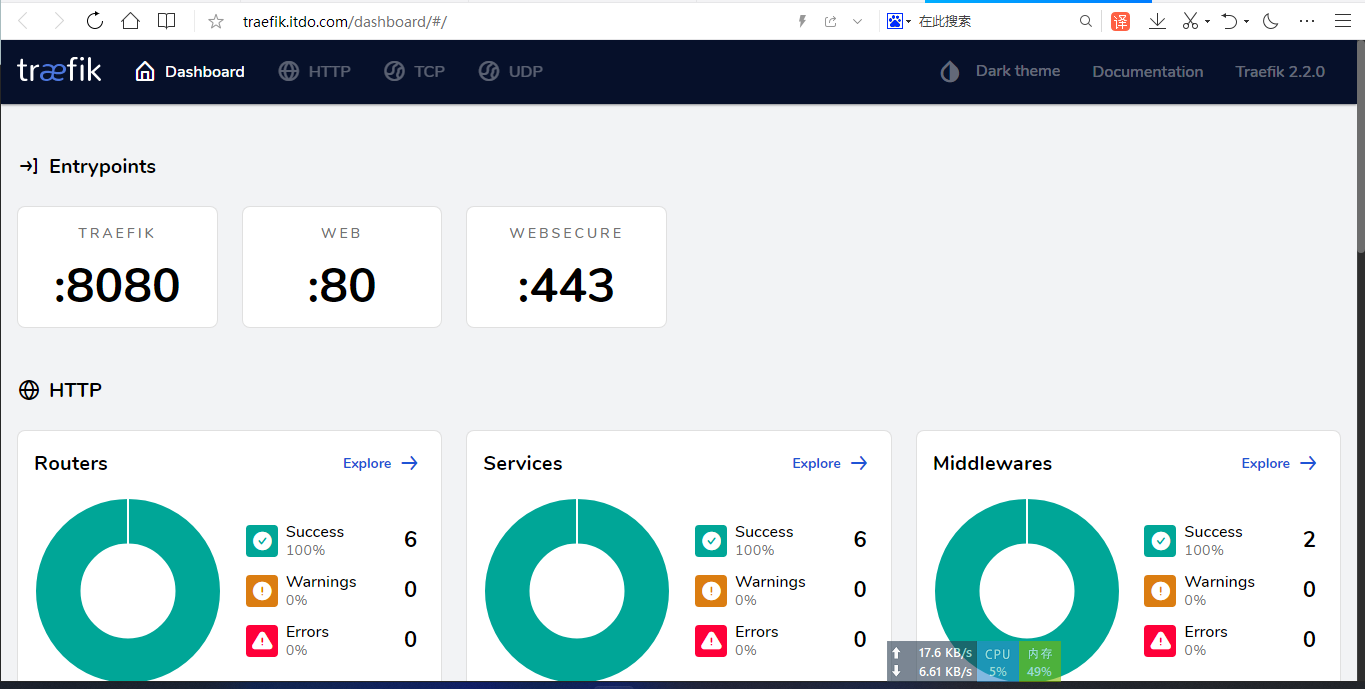
配置 HTTP 路由规则 (Traefik Dashboard 为例)
Traefik 应用已经部署完成,但是想让外部访问 Kubernetes 内部服务,还需要配置路由规则,这里开启了 Traefik Dashboard 配置,
所以首先配置 Traefik Dashboard 看板的路由规则,使外部能够访问 Traefik Dashboard。
cat >traefik-dashboard-route.yaml<<EOF
apiVersion: traefik.containo.us/v1alpha1
kind: IngressRoute
metadata:
  name: traefik-dashboard-route
  namespace: ingress-traefik
spec:
  entryPoints:
    - web
  routes:
    - match: Host(`traefik.itdo.top`)
      kind: Rule
      services:
        - name: traefik
          port: 8080
EOF
#部署Traefik Dashboard 路由规则对象
kubectl apply -f traefik-dashboard-route.yaml
3.配置nginx
3.1 nginx添加以下配置
#vim /home/nginx/conf/conf.d/itdo.com.conf
upstream default_backend_traefik {
    server 10.4.7.52:81    max_fails=3 fail_timeout=10s;
    server 10.4.7.53:81    max_fails=3 fail_timeout=10s;
    #此ip为node ip+81端口,每个traefik node节点都需要加上,将请求转发到traefik处理
}
server {
    listen       80;
    server_name *.itdo.com;
    location / {
        proxy_pass http://default_backend_traefik;
        proxy_set_header Host       $http_host;
        proxy_set_header x-forwarded-for $proxy_add_x_forwarded_for;
    }
}
3.2 测试访问
windows 修改本地的hosts
C:\Windows\System32\drivers\etc
追加一行:
nginx IP traefik.itdo.top
浏览器访问http://traefik.itdo.top
4.发布其他资源
查看当前svc资源信息
[root@kubeadm-master istio]# kubectl get svc -n istio-system
NAME                   TYPE           CLUSTER-IP        EXTERNAL-IP   PORT(S)                                                                      AGE
grafana                ClusterIP      192.168.63.236    <none>        3000/TCP                                                                     44h
istiod                 ClusterIP      192.168.10.115    <none>        15010/TCP,15012/TCP,443/TCP,15014/TCP                                        3d14h
jaeger-collector       ClusterIP      192.168.241.44    <none>        14268/TCP,14250/TCP,9411/TCP                                                 44h
kiali                  ClusterIP      192.168.21.135    <none>        20001/TCP,9090/TCP                                                           44h
prometheus             ClusterIP      192.168.246.234   <none>        9090/TCP                                                                     44h
tracing                ClusterIP      192.168.184.7     <none>        80/TCP,16685/TCP                                                             44h
zipkin                 ClusterIP      192.168.206.131   <none>        9411/TCP                                                                     44h
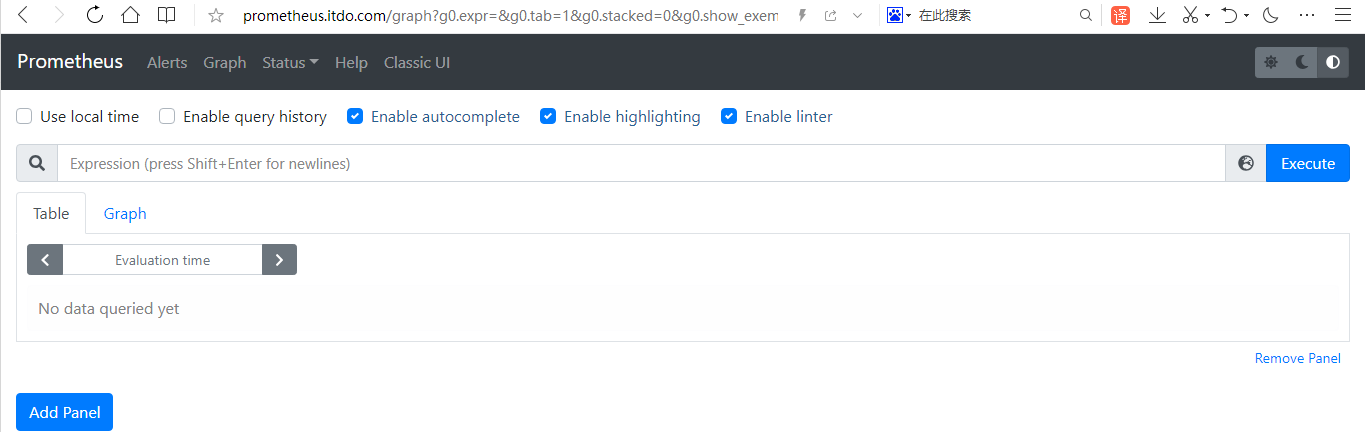
这里选择发布prometheus控制台
# vim prometheus-traefik-route.yaml
apiVersion: traefik.containo.us/v1alpha1
kind: IngressRoute
metadata:
  name: prometheus-traefik-route   #定义发布的IngressRoute名称
  namespace: istio-system     #所在命名空间
spec:
  entryPoints:
    - web
  routes:
    - match: Host(`prometheus.itdo.top`)   #访问的域名
      kind: Rule
      services:
        - name: prometheus  #svc名称
          port: 9090        #svc暴露的端口
#部署
# kubectl apply -f prometheus-traefik-route.yaml
添加dns解析
nginx IP prometheus.itdo.top
测试访问http://prometheus.itdo.top